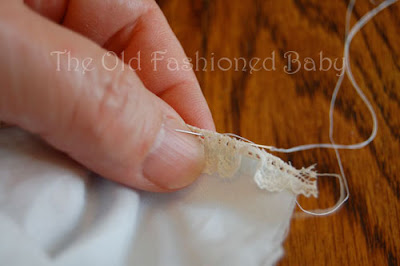
To assure the lace is gathered evenly, divide the lace in half and also divide the area where the lace will be attached in half. Then match them up.
Divide the piece of Lace Edging in half and fasten a small safety pin at the half way point. A safety pin is easy to see and doesn't move on you! Fasten a safety pin or mark the Lace Insertion or Entredeux at the half way point too. I am using a French Baby Lace. It has threads in the Lace Heading to gather. When you purchase your lace be sure to buy the fine cotton lace (it might have about 10% nylon in it to strengthen it).
Pull a thread in the lace heading (the straight part of the lace made up of several threads) to gather. Pull very gently and don't be in a hurry or the thread might break. If it does break, simply pick up a different thread to gather.
For more control of the gathers, pull up two or three threads in the lace heading.
When pulling more than one thread to gather lace you must go very slowly. Because more threads are used to gather it enables the gathers to stay in place much better than when only one thread is used. And because the gathers do not shift so readily, it is easier to attach the gathered lace to another piece of lace. It is more difficult to gather with three threads. Remember to pull the threads gently and slowly. This is a good method to use on necks and sleeves but it would be most tedious to use on a long piece of lace such as around the hem of the dress.Stitching Lace Edging To Lace Insertion
I will whip the Lace Edging to the Lace Insertion with right sides together. In this photo the Insertion has already been stitched to the dress. The method is the same if the lace is not stitched to the dress - right sides together.
Use a fine needle and thread. I am using an 11 Sharps and a Madeira #80 thread. Take a stitch through the lace heading of the Edging and Insertion as shown, binding both headings together. Pull snug with each stitch. Check gathers frequently to make sure they haven't shifted. I am stitching the lace right sides together. And I am stitching from right to left (or top to bottom is shown).
Continue down the length of the Lace Insertion until complete.
When I am done stitching, I will smooth open the lace so that the right side of lace will be facing up, alongside to the lace insertion.
Stitching Lace To Entredeux
I am trimming away the clipped edge of the entredeux selvage from the neck of this daygown.
Trim away the selvage of the entredeux.

See the little safty pin marking the center of the lace!
Be sure to mark the center of the lace and the entredeux.
A lace board helps because you can pin the entredeux and lace in place as you gather. You will take it off the board to stitch.
Evenly gather up the lace to fit the entredeux, matching centers.
Position the lace in front of the entredeux and hold together as you stitch.
This Picture shows how it looks as you stitch.
Work from right to left, bringing the needle through each hole of the entredeux and through the lace heading, binding the entredeux and the lace together.
Here you can see how the needle goes through the entredeux and lace.
Top view.

Back View.

Pretty little finished sleeve.
Use the same method to attach Flat Lace Edging to Entredeux. Just don't gather the lace!
To see more information about stitching Lace to Entredeux go Here.


5 comments:
Great tutorial! Thanks!
Great tip with the safety pin! I would never have thought of that. I seem to have preferred straight pins and bleeding on my piece before now. I will try this next time. Thank you.
Jeannie, I don't quite understand about attaching the gathered lace to the insertion. When you put the right sides together does that mean when you are finished it will press back over the heading (like a ruffle attached to the bottom of a dress? I am sorry but if I don't ask I won't know. Thanks.
Gigi, When you are finished, you will finger press (or iron) the lace back out over the heading. Tomorrow, I will add to my lesson to make it more clear. Please do ask questions!!
Thank you for taking the time to post this lesson. I have never hand sewn lace on a gown. I was able to follow the directions and hand stitch my lace on with no problem. I have procrastinated on getting this gown finished because I was not looking forward to hand stitching. Your instructions were fabulous!
Post a Comment