Buttonhole in Antique baby garment.
Click on Pictures to Enlarge.
Nothing seems to stress a lady as much as making Buttonholes!! By hand or machine. Just relax and always do at least one practice buttonhole using the same fabric and amount of fabric layers as your garment
The Handmade Buttonhole is nothing but a slit in the fabric with the Buttonhole Stitch (not to be confused with the Blanket Stitch) worked around it to secure and reinforce the fabric.
Starch and press your fabric. Don't skip this step, it gives your fabric body and stiffness and is much easier to work with. Work buttonholes one at a time using a 10 Sharps or Embroidery needle and DMC #50 , Mettler #60 or Mettler #50 Silk finish - All 100% cotton threads.
Mark The Buttonholes
Mark The Buttonholes
Draw a straight line for the top of each buttonhole.
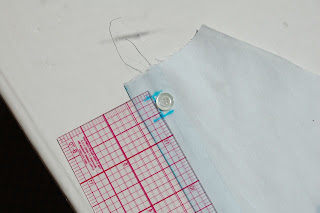
Step 1. Mark Buttonholes with fabric marking pen. Mark a dot at the top of each buttonhole according to your pattern. Then draw a straight line where the dot is.
Line up your button just under the top line. Draw another line under the button. Draw a vertical line connecting the top and bottom line. Make sure it is centered in the facing.
Mark all the buttonholes. After you size the first one you can measure for the rest.
Follow These Instructions. Click to Enlarge.
Cutting The Buttonhole
Cutting The Buttonhole
Fold fabric on vertical buttonhole line and cut through all layers of fabric.
When opened, the slit will look like this.
Cut Buttonhole - Fold Fabric on drawn buttonhole. Cut buttonhole just on the edge of fabric (about one thread or two). Cut through all layers of fabric.
Reinforce The Buttonhole
Reinforce The Buttonhole
Bring thread up from the back (tie on with a small back stitch in the bottom layer of fabric).
Then take a stitch to the other side of the buttonhole.
One thread stitched along either side of buttonhole as per instructions.
This is what the wrong side of the buttonhole looks like after you have 'laid' the thread on either side of the buttonhole slit.
I cheated and used a knot!
Overcast the edges. The overcast stitches should be no wider than the finished buttonhole stitch. 1/16" for each side.
Reinforce the Buttonhole - To do this lay one strand of thread alongside the cut opening, placing one on either side. And overcast the raw edges. The stitches should lie firmly but not pucker the fabric.
Stitching The Buttonhole
In this picture running stitches were used instead of the two strands of fabric on either side of the opening. You can not use the running stitch to reinforce delicate fabric.
Buttonhole stitch - Insert the needle down into the cut opening and bring needle up onto the right side of the fabric. The thread should loop behind the needle at the top and bottom of the needle.
Pull the needle gently toward you and the knot will form.

When the knot has formed, pull the needle snugly upward to form the little Buttonhole "purl".
When stitching the outside curve, begin slanting the needle before you reach the end of the slit.
When buttonhole is complete, take the needle to the wrong side by stitching down into the purl that is to the left of the one you just finished.

Run the needle and thread through the stitches on the wrong side to secure.
Buttonhole on Antique Garment.
Notice how the stitches are not touching. This is not a machine buttonhole where the stitches are almost a satin stitch. The stitches are farther apart in the Handmade buttonhole. Room needs to be allowed for the purls that line the cut edge of the buttonhole. The purls are necessary to give the buttonhole the strength it will need for repeated buttoning and unbuttoning.
If you are following my Sew Along - Click to go Back to Lesson Two
"I can do all things through Christ which strengthens me."
Philippians 4:13


.jpg)


7 comments:
I came up with my first (but probably not last!) question. When laying the threads on either side of the buttonhole, it looks like just a tiny stitch at either end of the button hole to secure it but not stitched through the fabric along the sides. Am I reading this correctly or have a mixed it up? Thank you and thanks also for the VERY fast shipping on my kit!! YOu sent it Saturday and I had it on Monday!
Answer to Eileen: I put another picture so you can see the back of the fabric after I have laid the threads on either of the buttonhole slit. There is only a small stitch taken at the end to travel to the other side.
Thank you! That makes it very clear (working the night shift last night probably didn't help my comprehension:)
This is great! I think a handmade button hole looks so much better on an heirloom garment than a machine button hole!
Thank you for learn us!
Thank You for learn us!
Tried many (!) practice buttonholes for lighter fabrics and ended up using a combination from the old (early 1900s) sewing book and this tutorial. After startching (thanks!) I draw the line in pencil, then make the outline rectangle with very tiny stitches. I make the cut through the middle, but don't overcast as it makes my buttonhole look cluttered. I then make my buttonhole stitches between 1/16-1/8" (3/32"?) apart. Buttonholes look clean, but are sturdy.
Post a Comment