Fine Heirloom Sewing, Smocking and Hand Embroidery

"Baby will be well and smiling in little garments made by Mother, Auntie, Grannie and loving friends!"

Please join me as I teach the old fashioned techniques and skills needed to sew baby clothes. You will find lessons that start at the very beginning and take you step by step as we sew little baby clothes together. May you find much joy and pleasure in making them.
It's easy and it's fun!!

Visit My Heirloom Sewing Webshop www.oldfashionedbaby.com


Showing posts with label Crochet Blankets. Show all posts

Friday, August 8

Handmade Baby Blanket and Daygown at Sew Sew's


This is the last item to show from my Sew Sew's get together.
If you click to enlarge this picture you can see how Carole stitched trim on either side of her day gown.  Again she used my out of print pattern but this technique would be great on Baby's First Daygown!

The Blanket she made to give with this Daygown is to die for!


Carole crocheted around the Blanket in her famous method that makes a beading through which you can thread a ribbon. (don't ask me how, I'm not that smart!)

And she used a poly ribbon to make the beautiful Bow that was secured with French Knots.

How clever she is!

(I know the Mother-to-Be must be very excited when Carole is invited to her Baby Shower)

All Designs Are Copyright Protected copyright 2014 Jeannie Baumeister

Monday, August 22

Flannel Baby Blankets.

Hard to imagine that winter is coming!  It is so hot outside. But it will come and we will be yearning to be warm again.  Here are some flannel Baby Receiving Blankets with crochet edging to show you.

White Edging with a Blue Bullion Rose.

Yellow Edging with a Yellow Bullion Rose.

Pink Crochet with a Pink Bullion Rose.

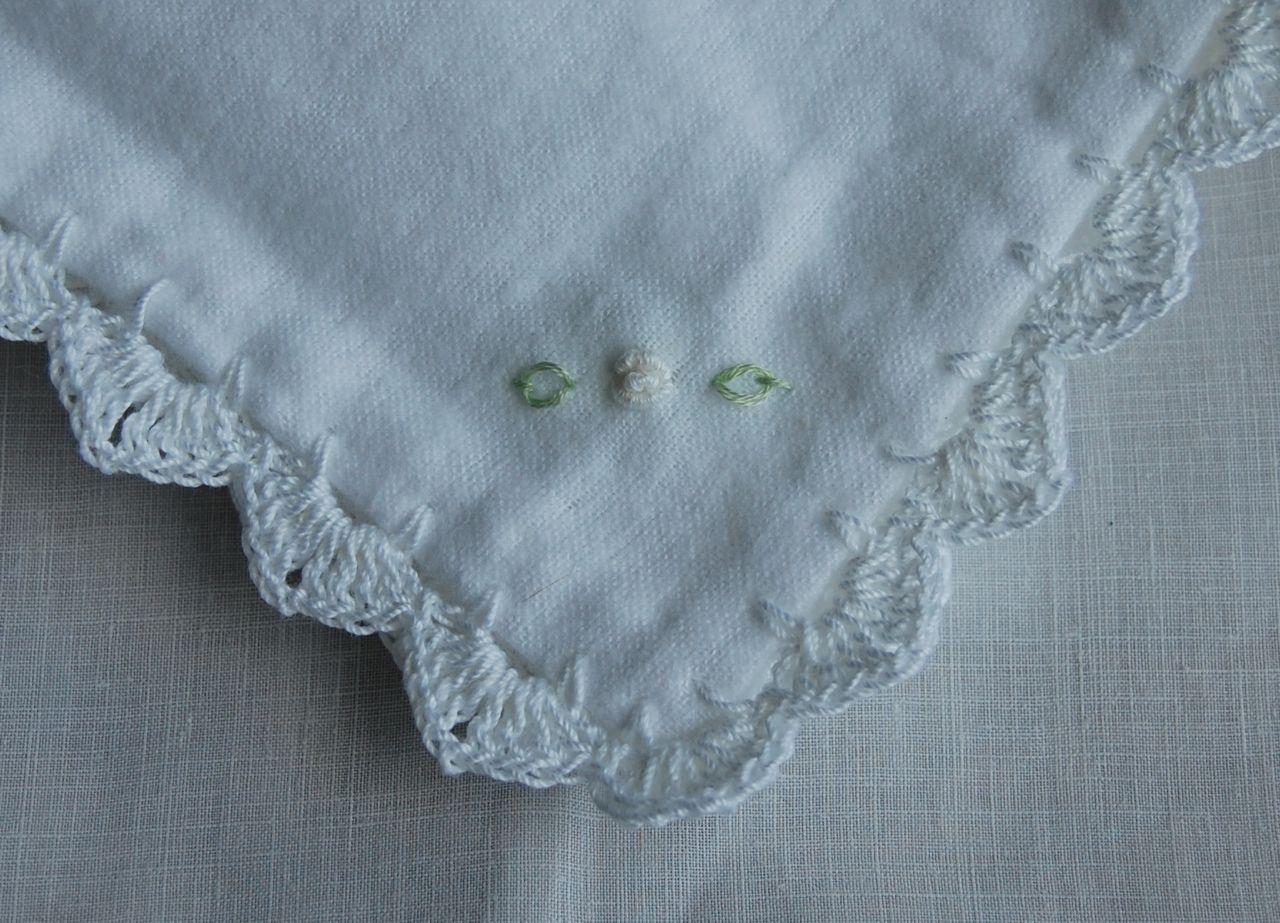
White Crochet with a White Bullion Rose.

I love them all but the White edging  with the white Rose is my favorite. 
Very snuggly!


All Designs Are Copyright Protected copyright 2011 Jeannie Baumeister

Tuesday, July 12

Miss Carole's Crochet Baby Blanket Part 3 - Shell Stitch


For Lesson One...
For Lesson Two...

This is how Carole  makes her Shell's around her blankets.

Carol's pretty Shell's.


*NOTE - This is not a Crochet Lesson.  She is giving instructions for those who already know how to crochet.  

You will need to find Beginning Crochet Instructions to learn to Crochet.

The row of Shell's begins after the first two rows are completed (see previous lessons). If you are changing colors, tie on here.  The Shells will be row three.

Step 1.  Work the scallops from the WRONG side of the blanket (you will be working in the opposite direction). 

Step 2.  For the first scallop only:  Chain 4; work three double crochet (dc) chain 1 combinations and one double crochet in the same single crochet as you began your chain 4.  (first Shell made)

Step 3. Skip four single crochets. In the next single crochet work 4 double crochet, chain 1 combinations and  one double crochet without  the chain one after it.   Repeat Step 3 around the entire blanket and join the thread from the first scallop by working a slip stitch between the top of your original chain 4 and the loop in your hook.  Tie off in a secure knot and weave the long ends carefully into the finished work.  This blanket will be a favorite so be sure that is one SECURE knot!!
Use a cute little holder when putting your work away.


Very pretty with two colors!


All Designs Are Copyright Protected copyright 2011 Jeannie Baumeister

Monday, May 9

Miss Carole's Crocheted Baby Blankets - Part Two!

Size 30, 20 and 10 Crochet Cotton shown.  Size 10 is the largest thread.
Here are three different  balls of DMC Cebelia crochet cotton which is what Carole likes to use.  More information HERE about threads.

She recommends Steele crochet hooks.
Size 10 hook for thread size 10
Size 12 hook  for thread size 20
Size 14 hook for thread size 30

* NOTE - These are not Learn To Crochet instructions.  Carole is telling you how she makes her blankets.  

You will need Beginning Crochet Instructions to follow this if you do not know how to Crochet.

Here is a link to Learn To Crochet.
You will find another one at the end of this post!

See Crocheted Baby Blankets  - Part One if you haven't read it yet.
With the right side of the flannel facing you, work the single crochet in each hole created by the machine wing needle.  You will be folding the raw edge of the fabric to the wrong side as you stitch.

Here is what it looks like on the wrong side of the blanket.  

Don't worry about the raw edge.  Carole tells me she has never had a blanket unravel!  And she has been doing this and giving them away... and using them for years so she should know!!  After a washing it will all snug up and you can clip away any  fuzzy threads.

Right side of Blanket.
Single Crochet is worked all around the blanket. When you get back around to your starting point,  make a slip stitch between the first single crochet worked at the very beginning and the loop on your hook.

Don't pull stitches too tight!!  And be careful turning the corners.  If you are too tight they won't lie flat.

To begin Row 2...chain 1 and with the right side of the blanket still facing you, work a single crochet in the top of each single crochet of row 1 all around the blanket.  When you get back around to your starting point of row 2, make a  slip stitch to join the first stitch of row 2 with the loop on your hook.

The two rows of single crochet are what gives the blanket a nicely finished look.

Here, Carole shows us how she worked the first row of single crochet on the pink checked blanket in white and the second row of single crochet in green, then she made the scallops in white.

She has a cute little stitch holder for when she puts her work down!
Close up of the 1. White single crochet 2. Green single crochet and 3 the White Scallop.

Carole will explain how she makes her scallops next if you would like!

I am adding a disclaimer.....  

I don't know how to make this blanket myself so if you ask me any questions my answer will be "You will need to find a Crochet Book or web link listed here to learn how to Crochet".  

Here is another website that might help you!


Hope your are enjoying Miss Carole's blankets.

Happy Stitching!


All Designs Are Copyright Protected copyright 2011 Jeannie Baumeister

Thursday, May 5

Miss Carole's Crocheted Baby Blankets

I know you have been wanting to know how to prepare the fabric before crocheting an edging on a baby blanket!

Meet Carole. 
Queen of Crocheted Baby Blankets!

She is going to show you how she prepares her flannel before she crochets it.
And she will show you a simple edging.

This is not a Crochet Lesson though!  Sorry!!

  Wash flannel  and dry in your dryer.
1.  Tear fabric to get a straight edge.  Do this to all four sides.  A generous "Carole Size" blanket is 45"X 45".   For a new born swaddling blanket - cut to measure 36"X36".

* You will need 1 1/4 yards of Flannel or for you can use plisse or Seersucker.

2.  Round all the corners of the blanket with a pretty  tea saucer or salad plate that measures about 6" to 8".  Carole used an 8" salad plate here.  Place the plate in the corner of the blanket to create your curve.  8" plate makes a gentle curve.

 Mark, using a wash away fabric marker and cut out the rounded corners.


It is important to trim off  the selvages and any fuzzy or ravely edges.

Go to your Sewing Machine - but take the thread out of the machine!
Set your stitch length between 2.5 to 3 depending on the thread size (and I think if you crochet loosely).  Stitch a trial to see which works best for you.

3.  Carole used the sewing machine to help her punch holes into the fabric so she can easily insert her Crochet Hook in to the fabric and the even spacing has been done for her.

Line up the cut edge of the blanket about 3/8" away from the needle.  Stitch (remember - without thread) all the way around the blanket.

She uses an OLD dull wing needle , saved just for this purpose.  Stitch carefully around the blanket and don't stretch the blanket.

Next:   She is will crochet. 

But....

Oh look!! It's Tea Time.

We'll finish next post!!  See you then.


All Designs Are Copyright Protected copyright 2011 Jeannie Baumeister

Tuesday, May 3

White Wednesday - Baby Blankets

Three Baby Blankets.  The fabric is plisse which is perfect for a summer baby.
These blankets are made by a friends Mother (Mrs. G).  She loves to crochet and she makes them faster than anything I have ever seen. Well, it seems that way to me because I am slower than anything you have ever seen. 

 She stitches them as she watches TV. 

She embroiders a Rosebud on each corner of the blanket.

My sewing friends crochet but if they ever would sell one of their blankets, I think it would cost a million dollars!

I especially like the pink because it's so girly!

She has a million color combinations.
But I like the classic White fabric with Pink, Blue or White.

I especially like the blue trim because I love the blue and white combination.

And I especially like the white because it looks so pure.  

 I buy them from her to sell in my  Web Shop.
And in the winter she makes them out of flannel.  

And this is my White Wednesday with Faded Charm today!

Happy Stitching To You!


All Designs Are Copyright Protected copyright 2011 Jeannie Baumeister

Thursday, May 20

On Making Crochet Blankets!

Many people have wanted to know about the green crochet that edges the pretty pink blanket.
My friend Carole did the crochet on this blanket.
And she has agreed to help me do a lesson on preparing the blanket for a crochet edging.  And a simple crochet edging.
Blankets made by Lisa for her new Baby Boy.
I received an email from Lisa who made these blankets after being inspired by a post I did about my sewing group.  The post featured blankets being made by one of my friends.
Machine embroidery done on Lisa's  Viking machine.
Her blankets are all so cute.  And you never have enough blankets!!
Congratulations on the new baby boy!!

So, stay tuned this summer!!


All Designs Are Copyright Protected.
 copyright 2009 Jeannie Baumeister
Related Posts with Thumbnails