Fine Heirloom Sewing, Smocking and Hand Embroidery

"Baby will be well and smiling in little garments made by Mother, Auntie, Grannie and loving friends!"

Please join me as I teach the old fashioned techniques and skills needed to sew baby clothes. You will find lessons that start at the very beginning and take you step by step as we sew little baby clothes together. May you find much joy and pleasure in making them.
It's easy and it's fun!!

Visit My Heirloom Sewing Webshop www.oldfashionedbaby.com


Showing posts with label Daygown Sew - Along. Show all posts

Friday, August 19

Sew Sew's Stitching.

Another pretty Show and Share at the Sew Sew's.  This lovely little bonnet will be sent off to a special baby as a gift.  The Smocking and Embroidery is beautiful.

Lorraine made the bonnet using the pattern in AS & E magazine.  Issue #39 from 1997.


I like the way she finished the Bonnet Tie where it is attached to the Bonnet.  With tiny Featherstitching!  How clever.   It is a double fold, stitched to the bonnet, then Featherstitched over.

Lorraine tapered the ruffled bonnet brim. Wider at the top of the bonnet and narrows slightly toward the sides.   She learned how to do this from Laurie's blog, SewNSew's Sewing Journal.

Visit Laurie to see how it's done!
It's cute!

"A friend is someone who likes you"
Joan Walsh Anglund

And this is my Pink Saturday this week.  Join How Sweet the Sound for more.


All Designs Are Copyright Protected copyright 2011 Jeannie Baumeister

Friday, September 10

Daygown Sew Along -Lesson Seven

Marking the buttonhole. 
Pin the Entredeux together at the neck so your daygown will be even as you mark the buttonholes.

Read all of todays Lesson before beginning!  We are working on the pattern Embroidered Raglan Daygowns.
We will be stitching the hem and sewing on the buttons.

The hem allowance is 3".
Read your pattern instructions about the Hem on View 1, Step 6.
One way to mark the hem, is to measure up 3" and mark a line where you will turn up the hem.


When basting a hem, use long stitches and remove them when garment is hemmed.

Another way to mark the hem, is to use a measure and pin or baste the hem at the lower edge.
Basting the hem in place at the lower edge is a good idea.  Then you can hem it with out worrying about the hem  being the right depth, or about being stuck by all the pins that would be needed to hold it in place.


Turn up the lower edge of the hem 1/8" to 1/4".  Press.  Then stitch a tiny Running Stitch along the fold of the hem.  To make stitching easier, stitch to the side seam and tie off.  Stitch the front and tie off.  Then stitch the last back section and tie off.  You can pull up the thread of each section to ease in the fabric.

Because this gown is A-line.  The lowest part of the hem  is wider than the area it will be stitched to (when turned up).  This is why you must ease the fabric evenly to fit.  

There is a method to reduce the hem bulk , thus reducing the amount of easing necessary but it must be done at the time of stitching the side seams.  I don't use it very often but perhaps it will be a later post.  If you have the pattern Baby Layette, it is explained  with the hemming instructions.

For a complete overview of  todays techniques please go to the Hem and Buttons post.  Read the entire post.  

This is the last lesson in this Sew-Along.  I have enjoyed sewing with you very much.  Next Friday, I plan to post some of your Daygowns from this Lesson.  So make me happy by sending me photos of your daygown!  It will encourage me to have another Sew-Along!!
Send to jbaumeister@cox.net.  I need them by Thursday.  Pictures of just a part (your favorite part) of the Daygown are welcome.

If you are a late comer, you can follow this Sew-Along by yourself and make a Daygown.

Question for this Lesson: What did you like best about this Sew-Along?  Will you send me a picture of your Daygown?

Now - Today I have something special for you!


My Great Grandmothers Fruit Compote bowl.
We are going to have a wonderful lunch together. 
 You can wear your PJ's to this Luncheon!

Good food to eat!

I found this antique two piece Punch Bowl in Norfolk several years ago.
And  Yummy punch to drink from antique punch cups!!

See you next Friday!!

Yummy Punch Recipe

One bottle of White Grape Juice
One bottle of Ginger Ale
One bottle of Champagne (optional)

Chill everything and add a large block of frozen Grape Juice or Ginger Ale.  Mix just before serving.


All Designs Are Copyright Protected copyright 2010 Jeannie Baumeister

Friday, August 20

Daygown Sew Along - Lesson Four

Today we will sew the Entredeux to our Daygown Sleeves and the Neck edge.

You will find the instructions for  the Old Fashioned Method of Attaching Entredeux to Fabric in your instruction guide on page one, under the heading Sewing Techniques.  Read them.

Read all the instructions in this Lesson Four post before beginning to stitch.
PS. You can have your tea first if you want to!

Stitch the entredeux to the sleeve first.
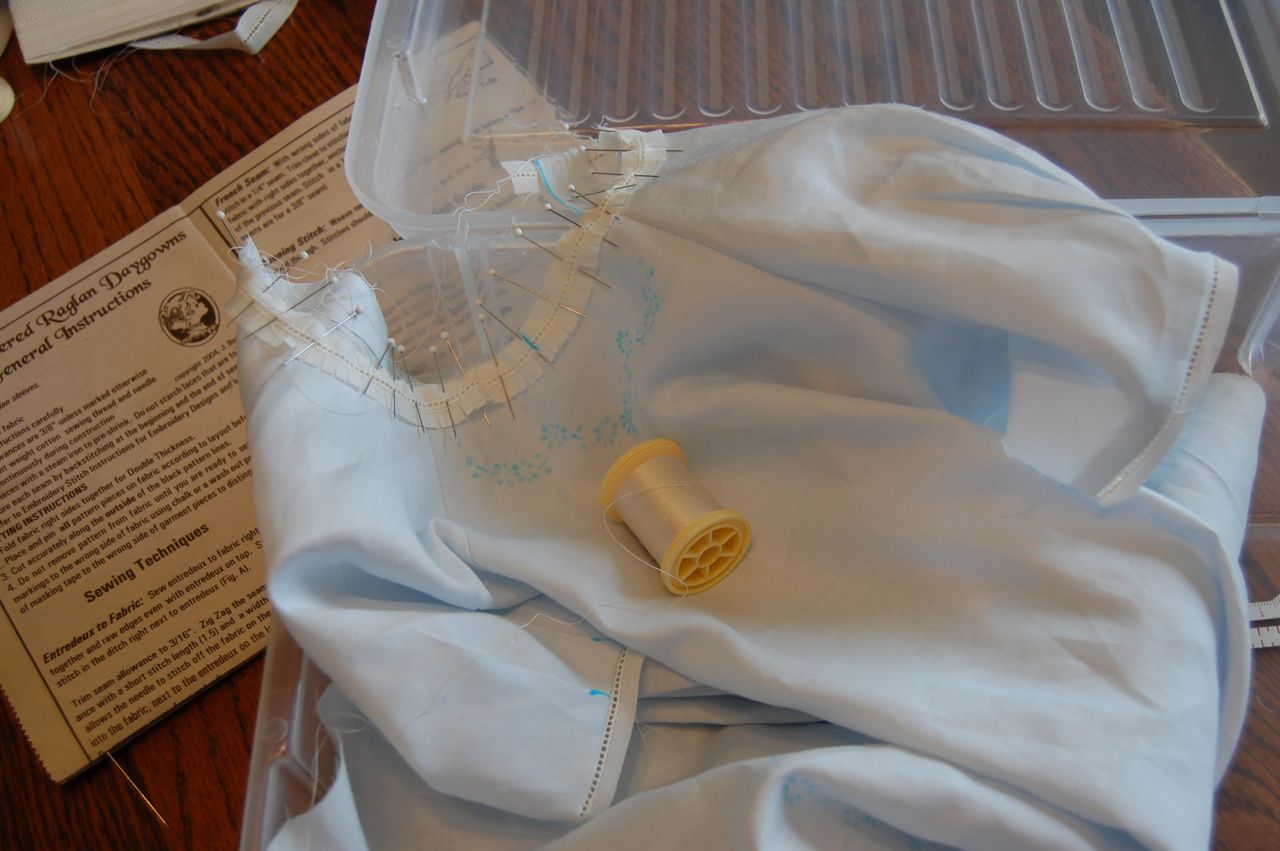
Entredeux pinned to sleeve, right sides together and raw edges even.
Cut the Entredeux to fit the sleeve edge.  This should be about 8".  Do not cut larger than 8".  If your sleeve is wider than 8", stitch a thread 1/8" from the raw edge of the sleeve and pull up the thread to ease the fabric to fit the 8" of entredeux.  The difference between easing and gathering is that easing pulls the fabric up slightly without gathers forming.

You will go to Attaching Entredeux the Old Fashioned Method for  more detailed instruction.

Stitch the entredeux to Neck Edge.
Read the instructions about your neck edge in your Pattern Instruction Guide.
Look in View 2,  Step 4.
Then go to the Lesson about Attaching Entredeux.

Your thread will frequently run out before you finish stitching.  When stitching entredeux to fabric, you can usually hide a knot behind the entredeux.  But when stitching a seam, there is no place to attach or hide a knot.  Click on Knot for information.

Question for Lesson 3:  How many years have you been sewing?

Now it's TEA TIME!!

Pretty yellow Roses are from my garden.
We are having tea in my garden today!
Oatmeal Crisp cookies, and Lady Grey tea.  My Brown Betty teapot was carried home to me all the way from England by my sweet Mother In Law.  Don't you love the name..."Brown Betty"?

And pretty tea cups!
Enjoy my flowers.

Thank you for coming!

"Won't you come into my garden? I would like my roses to meet you!"


All Designs Are Copyright Protected copyright 2010 Jeannie Baumeister

Friday, August 13

Daygown Sew-Along Lesson Three

Be sure you have marked the Sleeve Pleats onto your fabric.
We are making View 2 from our pattern Embroidered Raglan Daygowns but we are making the sleeve from View 3.  The Sleeves have little pleats instead of gathers. Go to View 3, Step 3 in your pattern Instruction Guide.  I didn't write on the instructions that you are stitching the pleats from the wrong side of the fabric, so you might want to pencil that in.
Remember to knot the thread just inside the seam line, then stitch to the end.  (like you did at the neck when stitching the facing)
Fold the fabric on the Pleat Fold Line (right sides together) and stitch on the Stitching Line.  I put little Dots on my Fold Lines so I could tell them apart from the Stitching Lines on my sleeve.
Stitched Pleats.
I used the DMC #50 thread and #11 Sharps needle. I waxed my thread.
The pleats give a tailored look to the sleeve and are especially appropriate for Baby Boy's as well as girls. 
 Following my pattern instructions, I pressed the pleats and stitched them in place.


Sewing the Sleeves to the Daygown
Front and Back.
Here you see the sleeve between the Front and the Back of the Daygown.
The sleeve will be sewn to the Front and Back in a French Seam.
Lay out all your garment  pieces just as they will be sewn together.  This will help you know how the pieces need to be sewn together and not get them mixed up. The seams will be stitched using a French Seam.  Please click on French Seam Lesson and read the entire Lesson.  Refer back to it as needed when stitching your seams.  There are also French Seam Instructions in your pattern instructions (under the heading  Sewing Techniques). 
When you are stitching seams by hand, you lack the presser foot and guide plate on the sewing machine that help you keep your seams straight.
I recommend you mark 1/4" along the  fabric edge.  You will stitch on this line for the first seam in your French Seam. And your seams will all be straight.
Sleeve and Back are pinned wrong sides together, ready to stitch.
Be sure you are sewing the BACK of the sleeve to the BACK of the Daygown!
Because the seams are stitched with a French Seam, I find it easiest to sew all the pieces wrong sides together  first. Then, go back and sew all the seams  right sides together to finish the French Seam.  It helps to keep me from being confused about which seams go where.
In this picture I have sewn wrong sides together, trimmed, turned fabric to right sides together  and am now sewing right sides together in a 1/8" seam.
After I have sewn all the seams  wrong sides together, I go back and finish the seams one at a time. Do not trim until you are ready to stitch a seam. You will follow the French Seam Lesson.

Then press all the seams and staystitch the neck edge 1/8" away from the raw edge.

"Many women exclaim regretfully when they see machine stitching on a baby's garment.  Many of the finest baby dresses that are French seamed have the first seams stitched on the machine and the second seams done by hand.  This is an ideal way because the machine stitching gives strength to the seam and allows it to hold better in laundering, and to all appearances the dress is entirely hand made."
How to Make Childrens Clothing- The Modern Singer Way.  Copyright 1927

No one will ever know , unless you tell!!

Now, baby clothes made entirely by hand  are very durable, especially French Seams, so you must remember the source above...A Sewing Machine Company!!)

Question for today - Where in your house to you sew?  Sewing Room, kitchen,  Special closet space?  And what one thing would you change about it? 

Now, it's my favorite time.
Tea Time!!

Gingerbread!! And my favorite, Earl Grey tea.


All Designs Are Copyright Protected copyright 2010 Jeannie Baumeister

Friday, August 6

Daygown Sew-Along. Lesson Two


The Embroidery Design is on page 2 of your pattern instructions. Get it out and look at it.
Starch and Press your Dress Front (do not press over tape on wrong side).  Fold Daygown Front together and crease Center Front all the way down to the hem.  Read Step 2 for more instruction.

There are different ways to transfer embroidery designs onto fabric.   I am showing you how I will transfer the embroidery design using this pattern and this embroidery design.   

Link for Lesson on Transferring  Embroidery Design Here!  Read the entire Lesson even if you don't think it applies to you.

 Then come back to this lesson and continue.

Read all instruction in this Post about the Embroidery before beginning your work.

Line up the Daygown Front neck with the neck edge of the embroidery design. (in picture above)
 I have my design pinned to a Fabric Board.  An ironing board can work as well.  Or, gently tape the design to the table so it will not move.  
Place a piece of white computer paper under the page with the embroidery design on it.  It will help make the design more visible.  I did not have any problem seeing the design through my blue Satin Batiste fabric.
 I am making my Daygown for a Boy Baby and although the embroidery design is elaborate, it is suitable for a boy.  To make the Daygown less fancy, just leave off the hem embroidery.  


I am measuring 6 3/4" above the hem for the right side of the hem design.  I will measure the left side of the design too.  I want to make sure the design is even on both sides of the daygown hem area.  
The instructions for the Hem embroidery design tell you to place the lowest part of the embroidery design  6 3/4" above raw hem edge.  It is important to measure for each side.
We will not embroider this lesson.  Set the fabric aside after tracing embroidery design.
Now go back and transfer your Embroidery Design. 
 Then come back for the MAJOR part of this Lesson. 

Question for Lesson Two - Where do you live?  Which State if in the USA.  Please post comment at the end of this Lesson on this Post.

Buttonholes!!
It is raining this morning.  Perfect sewing weather.  It feels nice to just look out the window at the rain.
I down loaded some Joshua Bell music "Romance of the Violin" to listen to.  Perfect music for Handmade Buttonholes!

Most of the old Baby Clothes were made by hand and even the old Baby Clothes that were made by machine had Handmade buttonholes in them.  There was a practical reason for this.  The sewing machines did not make pretty little button holes.  Today our sewing machines can make lovely buttonholes.  There is no shame in putting machine made buttonholes in your little Daygown.  Having said that, I REALLY want you to stitch at least  a couple by hand on a practice fabric.  Your dress is not entirely made by hand if you use the machine for buttonholes.  

Always stitch at least one buttonhole on the same fabric as your garment before stitching the buttonholes on your  garment.  Have the same layers of fabric for practice as you have on your garment. (two for this daygown)

Machine Stitched Buttonholes: Use a very light weight stabilizer under the fabric.  I use plain old tissue paper.  Use DMC #50, Mettler #60  Mettler Silk Finish #50 cotton thread (top and bobbin).
Sewing your Buttonhole will depend on your Sewing Machine and you will need to refer to your Machine manual or your local Sewing Machine Dealer.  Usually the top tension is tightened , sometimes the machine does this automaticly.

Click Here For Handmade Buttonholes.  Then come back here!

I was a little late this morning because I baked a cake for you!  
It is my goal to get the Lesson up by 9 am on Friday!

Today, we are having homemade Chocolate cake and Pomegranet Green Tea.  Using my Wedgewood "Romantic England" blue and white China.  Yum!


And we can watch the birds play!


Romantic Birds too!  I have a theme going here!

Thank you for coming!

Little Drops of Water
Little drops of water,
Little grains of sand,
Make the mighty ocean,
And the pleasant land.

Little deeds of kindness,
Little words of love,
Help to make earth happy,
Like the heaven above.
Author Unknown


All Designs Are Copyright Protected copyright 2009 Jeannie Baumeister

Thursday, July 29

Lesson One - Guidelines and Begin!!

If you are just now joining and need to know what materials you need - click HERE!


Sew Along - Guidelines

This is a weekly Lesson and I hope you can all be with me today to begin the lesson.  You will actually have one week to complete each Lesson.  In other words Lesson 1 should be done before Lesson 2 etc.  So, it doesn't have to be finished today.

Lesson One Question - Who are you making the Daygown for?   A special little person or just for fun?

To Join and sew with me:
1.  Email me at jbaumeister@cox.net and let me know you will be joining the group. (if you already emailed me, please email me again!)  Latecomers are welcome!

2.  Each Friday, please sign in by leaving a comment at the end of the Post. The comment will answer the question I have asked you.  See above - Lesson One Question.  I am taking attendance you see, and I want to know who is there!! (but no one will  have detention if you cut class - I Promise!)
If you have never made a comment on a post  before, you might need to register. You will be told what to do when you attempt to post.  And you always have to type in the little squiggly word for the post to go in - that is so Google knows you are not spam. 

3. Questions!    No question is silly.

All questions must be asked through the "comments" under  each  Lesson Post (no email questions-sorry).   And the questions can only be asked during the week of the Lesson Post.  You have until the following Thursday to ask questions.  And the questions must be  made under the Lesson post it pertains to.  I will answer every question and you can ask them right up until the following Thursday.

Example - Lesson 1 - You can ask any question about Lesson 1 (this first Lesson) by posting a comment at the end of this Lesson One post.  Once Lesson 2 is up (really the night before), then no more questions about Lesson 1 will be accepted.  So it is best to stay  caught up with the group.

Now -Make a Comment below this post and then....Begin Lesson One!

 Click HERE


All Designs Are Copyright Protected copyright 2009 Jeannie Baumeister

Sunday, July 18

Daygown Sew-Along! Join Me!!

 Pattern is OFB Embroidered Raglan Daygowns.

I was already thinking about a Sew-Along when someone suggested I do a Daygown Sew-Along.  
What fun that would be!!!  I love Daygowns.

I have chosen Embroidered Raglan Daygown View 2.  I have done a lesson on Priscilla's Layette Daygown (sorry to say it is now out of print) and this is also a Raglan sleeve but it buttons in the back.
.
 The sleeve makes it easy for the Beginner but it also has the new techniques of adding entredeux and lace edging to the neck and sleeve.   I will also show you how to do the embroidery on this view.

This is the View 2 sleeve.  It is 3/4 length.
It has pleats instead of gathers but you can easily do gathers.

I plan to make and teach it by hand.   I am also happy to include those of you who prefer the sewing machine.   So, either way follow along and make yours by hand or machine. Both will be easy!
 The techniques are so similar.

 I plan to have one lesson a week, every Friday, beginning July 30.  We will be a Sewing Group!  I will serve you virtual Tea and Scones! The lessons will be easy for everyone to complete and I hope will inspire and encourage you to finish your daygown.

Blue Satin Batiste fabric shown for my Daygown.  I have also chosen soft ecru lace and entredeux.
Kit for View 2 Daygown is available on my web site in blue, pink or white.
I am giving you all time to collect your supplies.   You will need:


Kit for materials or - 1 yard of cotton fabric, 1 1/2 yards lace edging (about 3/8" wide), 7/8 entredeux in white or off white to match lace, 5 Mother of Pearl buttons, Floss for embroidery and the Pattern.
Hand sewing needles (I recommend #11 Sharps) and Embroidery needles (I recommend #10 Sharps or #10 Crewel for this design).

You need DMC #50 weight cotton thread for construction and Madeira #80 cotton thread to stitch the lace.  The Madeira  thread should match the lace.

See the Lesson on Priscilla Layette for information on what is needed.  You also want to pretreat your fabric before we cut out our Daygown.


All Designs Are Copyright Protected copyright 2009 Jeannie Baumeister
Related Posts with Thumbnails