Today we are going to attach the sleeves and stitch the side seams. Follow Step 3 in your pattern instructions. The seams are joined using French Seams. French Seams are used for seaming most light weight baby clothes. They are soft on baby's delicate skin and are stronger. French seams are made by sewing the wrong sides together, trimming the first seam allowance to slightly less than 1/8" and stitching again with right sides together in a 1/8" seam. For detailed instructions, See French Seam Instructions.

Put a towel over your ironing board cover to protect it when you starch.
The first thing I will do is starch and press each piece I will join.
Pin Back of Sleeve to Daygown Back. Wrong sides together for first stitching of the French Seam.
Pin the Sleeve to the Daygown, matching back of sleeve to back of Daygown. Match the upper edge and pin, then match the lower edge and pin. Stretch the fabric gently so they will fit together and pin the center. Then pin as necessary.

Both back sleeves are pinned to the Back Daygown and ready to sew.
Pin both sleeves to the Back Daygown, then stitch. Stitch from the neck down toward the underarm.
Close up of the Pfaff Straight Stitch/Quilting Foot
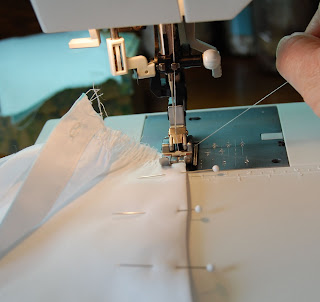
Stitch 1/4" away from the fabric edge, removing pins before stitching. The Quilting/Straight Stitch Foot is great for French Seams. They give you more control over the fabric, feeding fabric smoothly. And you can line up the edge of the fabric with the edge of the Foot, which is exactly 1/4" away from the needle.
First seam of the French Seam has been stitched,trimmed and pressed. Now sew with right sides together in 1/8" seam.
Be sure to hold the thread at the beginning of each seam for a smooth start. And back stitch to secure seam at beginning and end.
Pin the Daygown Fronts to the Sleeve Fronts, wrong sides together for the first stitching of the French Seam.
The easiest way I have found to sew garments together using a French Seam is to sew all sleeve seams at one time wrong sides together, trim them all at the same time, press them all, turn them all right sides together so you are ready to stitch the final seam. This is much less confusing than completing each seam one at a time. Do the same with the Side Seams.
Unfinished neck edge is shown with sleeves attached to Daygown Front and Back.

Pin the Daygown Front and Back (wrong sides together for first stitching) then sew in a French Seam.
Pin Daygown Front and Back together, including the sleeves. Pin the underarm seam first,matching underarm seams, then pin the sleeve edge, then pin the hem. If you need to stretch the fabric just slightly to match, that's ok. Pin as necessary before sewing in a French Seam. Stitch both Side Seams at the same time, stitching in a French Seam.
Sleeves and Side Seams are stitched!
Now, put everything back in your Project Box.
Until Next Time!


4 comments:
Okay, Jeannie, I realize I have been getting to the buttonholes on my babyclothes and stopping--never to complete them! With your directions, I had to stitch buttonholes early on--they look fabulous. My problem is my french seams--I went back and reread directions. I can get all the way to the final stitching--I either have seams that are too large or else I have fuzzies somewhere along the seam. They just don't look as neat as they should. I used my quilting foot for the l/4 inch seam--but couldn't decide which foot to use to go back and stitch the l/8 inch to enclose my trimmed seam. Any more advice? Thanks again for all your detailed tips.
Hi Gigi, Most people actually take up more than the seam allowance when they make French Seams. You can carefully mark the seam allowance on a scrap of fabric to check this out. So your first seam is 1/4" and you use your quarter inch (quilter) foot. Go back and measure to make sure it is still 1/4" after you stitch. Trim to a scant 1/8". That means to"almost" 1/8". So really you are trimming to just barely under 1/8". If you trim, there won't be fuzzies. The inside toe on my presser foot is 1/8". Yours might be too. Check to see what you can line up your fabric with to get it 1/8". Hope this helps.
Glad my button hole tips work for you. If you wait until the end to make them, they never feed right.
Thanks for the tips for the button holes and for the french seams, I used for the bubble that I am making for my baby girl. I was having trouble stitching the shoulders, the fabric was creeping under the foot,a nice lady at It’s Sew Heavenly in Lafayette told me that I had to pull the thread a little bit more when I started the stitch and start sewing from the arm to the neck. I was also having trouble keeping the 1/8" allowance but I got a 1/4" quilting Foot from Brother (SA125), it worked wonders for me. the right front edge provides a guide for the 1/4" inch seams and the left side is a guide, for the 1/8" seam is created and it had a small hole as you reccomended so it holds the fabric. I was wondering if you can give a tutorial for collars, this is the next step on my bubble and I am having a hard time understanding how to put it together (I'm sorry, I am just a beginner)
Diana, it sounds like you are doing a great job!! I am afraid I could not do a Collar lesson in time for you to use it on your bubble. A couple of tips. Starch your fabric well before you cut out the collars to prevent stretching. Trace the stitching line on the collar and stitch on the traced line. After stitching, stitch again 1/8" away from the first stitching line, toward the outside of the collar using a short stitch length. Trim right next to the outside stitched line. I will put that on my Lesson list of to do's. Thank you for visiting me here in my sewing room!
Post a Comment